Greetings!
Try searching for diy candle heaters or diy candle stoves. Many of the prepper sites talk about them too. The ones I prefer use either diesel, kerosene, or cooking oil. Nearly anything that uses regular candles can be converted to use refillable liquid candles. Just using votive or tea light candles is fairly popular too, but I prefer the refillable solution. I’m currently using cooking oil for everything, $4.50 a gallon at Walmart, and I’m over a month on a single gallon, while using it for cooking, heating, hot water, fridge w/freezer, and occasionally lighting. That’s decent bang for your buck in my book, and Northern Minnesota is cold…
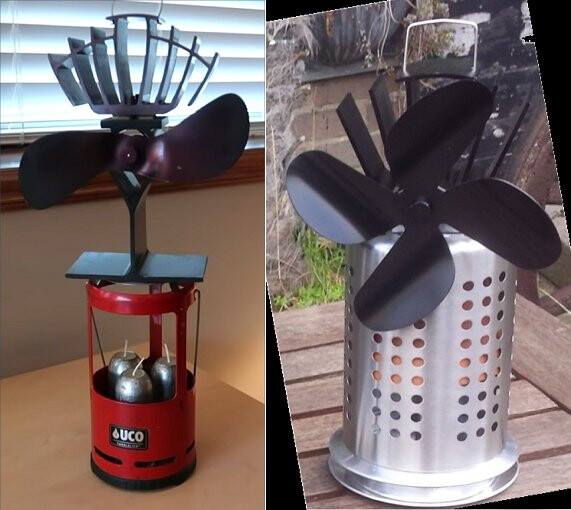
Above are a couple candle heaters with fans, on the left is a UCO candelier which claims to produce 5,000 BTU’s of heat. The one on the right is a Glo Warm designed to use (6?) tea light candles. It doesn’t list a BTU rating. Both of these have heat powered wood stove fans on top to circulate the heat without the need for electricity or batteries. There are plans online to convert the candelier to 3-4 liquid candles using airline size alcohol bottles.
I DIY’d the $100+ Glo Warm on the right. At Walmart or Ikea, you can get a kitchen utensil holder that looks just like theirs, and the wood stove fans can be purchased online or at a woodstove/fireplace shop, or if you’re cheap like me, they can be found at yard sales and flea markets dirt cheap. Then I made a liquid veggie oil candle out of a mason jar. In a 2"x2" grid in the center, I put 9 wicks, each spaced an inch apart.
Here’s a link to a DIY version of the Glo Warm to give you some ideas. I took a mason jar liquid candle, and turned the utensil holder upside down over it, and added the fan on top instead of the pot. Works GREAT! Without the fan, you can even cook on it.
Now I don’t have any way of measuring BTU’s, but if the candelier puts out 5k BTU’s with 3 candles, my 9 wick model should be capable of putting out 15k BTU’s. The neat part is that you can adjust the heat output by how many wicks you choose to light. The utensil holder just sits upside down right over the mason jar candle, and the the fan sits on top of that. I didn’t permanently attach the fan, because I use it for other things too. When not in use, the lid goes on the jar candle, sealing it for storage, and it fits right inside the utensil holder. A plastic lid headed for the garbage also fit perfectly on top of the utensil holder.
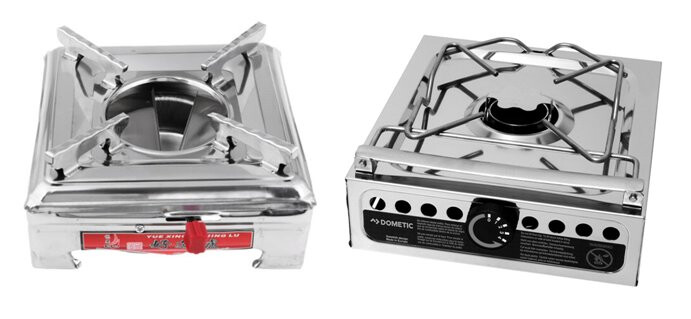
I’ve changed out my cooking burners for the ones on the left below, so far, so good, but I’m hanging onto all my original equipment too for now. These new ones are smaller, lighter, extremely stable, easier to store, and should be multi-fuel. I’m currently running them on cooking oil.
Both of the above stoves were designed to be used with alcohol. The one on the left is a cheap Chinese knockoff of the very expensive marine Dometic/Origo version on the right. Both work equally as well. The Origo has a large canister with a wicking material inside to hold the alcohol and prevent spilling. The cheap one just has an open cup inside to pour the alcohol into. The fuels I prefer require a wick, so I stuffed the open cup with carbon felt for a wick, and covered it with screen to wind up with something nearly identical to the Origo. With the wick, it will now run on cooking oil. Unlike with alcohol, a little bit of cooking oil will burn for a very long time. I have 4 of these so I can cook many things at the same time, such as meat, potatoes, veggies, and more. They work great with my Dutch oven, and my collapsible oven as well.
While many of the DIY type liquid candles run their wicks up through the lids, I don’t care for that. I prefer having the lid intact & the wick(s) below the lid, so I can replace & seal the lid when not in use. Some people use screens to poke their wicks through and hold them in place. Others use the floating wick method. While you can purchase or create individual floating wicks, you can also use a thin sheet of cork or craft foam, wrapped in a double layer of aluminum foil to protect it from the flame, and poke holes in that to feed your wicks through. They say that each wick should have a minimum of 1" clearance all the way around.
Jars with sealable lids come in many different shapes & sizes, any of which can be made into liquid candles. Some of the Sterno type metal cans also have a screw on lid, and can be easily converted into refillable instead of disposable as well.
Since many of the devices we use are unvented, proper ventilation and a Carbon Monoxide detector are highly recommended.
Cheers!
“Everything should be made as simple as possible." ~ Einstein